

Burn Tool


Selection history
|
|
|
|
|
|
|
Size:
Blur:
Exposure:
| | |

|

|
✕ |


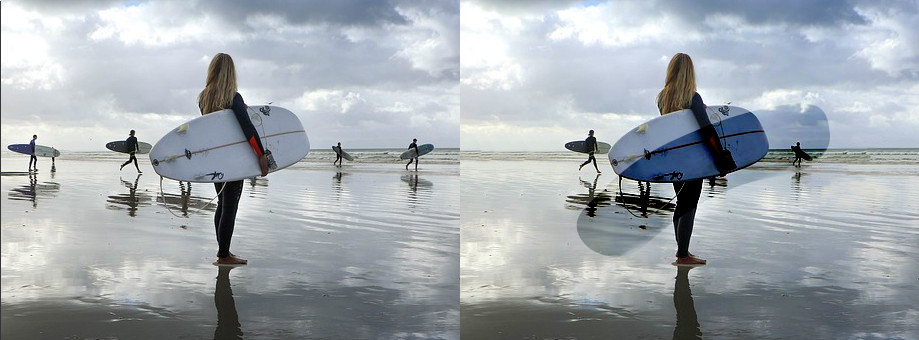
The burn tool is used to selectively darken areas in an image or photo.
Burning is an old school darkroom photography technique where a photographer would control the exposure of the photographic plate to darken certain areas in an image.
To burn the image the photographer would use a stencil to increase the relative exposure of certain areas of the photographic plate.
The resulting image would be darker in the areas with more exposure. With digital image editing there is no need for a darkroom or stencils.
You can darken areas in your image with the burn tool available in the online image editor at gifgit.com.
Upload an image to use the burn tool.
- Upload an image using the form above.
- Press and drag in the image to darken areas using the burn tool strokes.
- Adjust the settings in the tool options bar to set the size of the burn tool.
Selecting the Burn Tool
The burn tool is easily located by a grippy hand looking icon in the toolbar. Clicking the icon loads the burn tool to the online image editor and the tool options bar with its saved settings.Darkening with the Burn Tool
To darken an area with the burn tool you stroke the image in the desired area. Change the size and blur of the stroke using the input fields in the tool options bar. When darkening an area try to use the largest brush size that will cover enough of the area to eliminate having to make too many repeted strokes. This will prevent overlapping and compounding of darkened areas.The strokes can be made softer by increasing the blur. This will make the darkened area transition smoothly to the outside areas. A smooth transition will make the darkened area appear more natural.
Adjusting Exposure
The exposure determines how dark the burn tool makes the image when it is used. It can be adjusted by editing exposure entry values in the tool options bar. When adjusting the exposure you may have to iterate through several exposure settings and strokes before you arrive at an acceptable value to darken the image to your liking.Feature Rich Online Image Editor
Online photo editing with layers, layer masks, a workflow and user interface like a traditional desktop photo editor that provides you with the toolset and
features to professionally edit your images. No need to download or use desktop software like Microsoft Paint, Photoshop or GIMP to do quick edits. Edit your images online
with the best online image editor.
| Features | Gifgit Editor | Lunapic |
|---|---|---|
| Browser based editing (No software download) | Yes | Yes |
| Layers | Yes | No |
| Layer Masks (Non-Destructive Editing) | Yes | No |
| Selection tools | Yes | No |
| Undo History List | Yes | No |
