Gradient Tool
Click, paste or drag and drop files to edit
Select an image file jpg, png, webp

Drag and drop
OR
How to use the gradient tool
Upload an image
Use the form above to load an image. Click the 'Upload image' button, copy and paste or drag and drop an image into the uploader.
Setup
Set the foreground and background color to set the start and end colors of the color transition for the gradient.
Apply
Press and drag to draw a line in the image to set the start and end points of the gradient. The gradient is applied once the mouse is lifted.
Learn More About
the Gradient Tool
On this page
1. About the gradient tool
The gradient tool allows you to create smooth transitions between colors in your image. It is useful for adding depth, shading, or artistic effects by blending colors seamlessly.

2. How the gradient tool works
The gradient tool works by creating a smooth transition between two or more colors in your image. You can choose the start and end colors, and the tool will blend them seamlessly across the selected area, creating a gradient effect. Preset gradients allow you to quickly apply common gradient styles without manually selecting the start and end colors.
2.1 What is a Gradient?
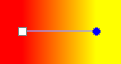
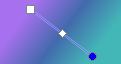
A gradient consists of a set of color-position pairs that determine how the specified colors should transition when used to fill an area. The color-position pairs are conventionally called color stops in image editing. Each color stop is assigned a position from 0 to 1 that is used to place the color relative to the distance of the drawn gradient line. The most basic gradient is a transition between two color stops but a gradient can theoretically have as many color stops as desired. Below is a table of two gradients in each row. Each column displays:
- a table of color stops for the gradient.
- a linear visualization of the color stops showing the color and its position in the gradient.
- a thumb of the draw gradient.
| Color Stop Table | Linear Visualization | Rendered Gradient | ||||||||||||||||
|---|---|---|---|---|---|---|---|---|---|---|---|---|---|---|---|---|---|---|
|

|
|
||||||||||||||||
|

|
|
In the table above two linear gradients are shown. The first gradient in the above table is a simple two color-stop gradient. The rendered gradient is as a result of drawing a horizontal line and shows how the gradient color transitions from red at the start point to yellow at the end point. Notice how in between the color stops the color changes from red to orange then to yellow. This is the color transition that a gradient creates between color stops.
As previously mentioned the color stop positions are relative to the drawn gradient line. For the first gradient the start point is at coordinate (22,31) and the end point is at (96,31). The color stop positions are relative to the line you draw to create the gradient. The red stop at position 0 will be placed at the starting point (22,31) and the yellow stop at position 1 will be placed at point (96, 31). This is how the color stops positions are positioned relative to the line. If another color stop were placed at position 0.5 then it would be placed at the center of the drawn gradient line at point (59,31).
The second gradient has three color stops. It is rendered along a non-horizontal line with purple at position 0 or the beginning, blue at 0.5 or in the middle and green at position 1 or at the end. This shows how gradients transitions the color stops along the direction of the drawn line. Any direction you draw the line the color transitions will follow.
2.2 Types of gradients
There are several types of gradients that can be created. The most common types are linear and radial gradients. A linear gradient transitions colors along a straight line, while a radial gradient transitions colors radiating from a central point. The type of gradient determines how the color stops are applied and how the color transitions appear in the rendered gradient.
Linear Gradient
A linear gradient fills the affected area with color transitions along a straight line from the starting point to the ending point of the line you draw with the mouse. An easy way to understand how the linear gradient is created is to imagine that adjacent perpendicular lines of transitioning colors are drawn between the color stop points along the drawn line. Below shows a gradient with a visualization of the perpendicular line transition beside it.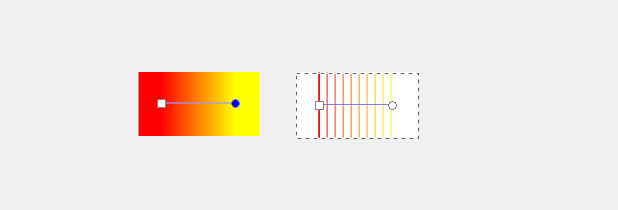
Radial Gradient
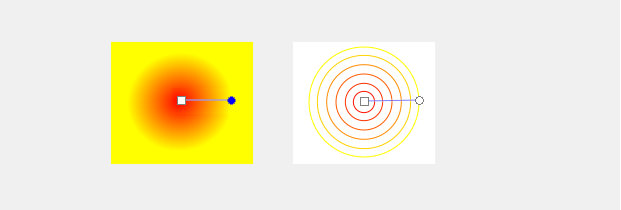
A radial gradient fills the area with color transitions that radiate out from the starting point to the ending point of the line you draw with the mouse. An easy way to understand how the radial gradient is created is to imagine group of concentric circles of increasing radius and transitioning colors. The circles are centered where you initially press the mouse to begin drawing the gradient. The radius of the largest circle is the distance between where you press and released the mouse. Below shows a radial gradient with a visualization of the concentric circles that create the gradient.