Eraser Tool
Click, paste or drag and drop files to edit
Select an image file jpg, png, webp

Drag and drop
OR
How to use the online eraser tool
Upload an image
Use the form above to load an image. Click the 'Upload image' button, copy and paste or drag and drop an image into the uploader.
Adjust
Adjust the settings in the tool options bar to set the size, and hardness of the eraser tool.
Apply
Stroke the image to erase areas where brush strokes are applied.
Learn More About
the Eraser Tool
On this page
1. About the eraser tool
The eraser tool allows you to remove parts of an image, making them transparent or revealing the background color depending on your settings. It is used to change the opacity or transparency of the pixels in its stroke. The eraser tool can be used in combination with selection tools to restrict erasing to a selected area. Upload an image from your computer or use a sample image to use the eraser tool.
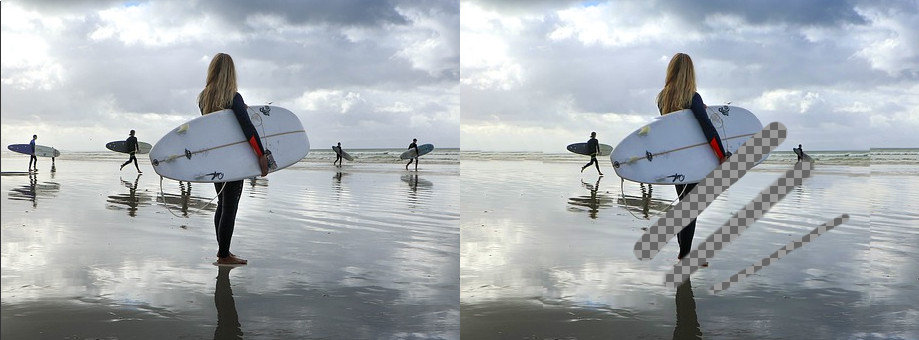
2. How the Eraser Tool Works
To use the eraser tool click the tool icon in the toolbar. This will activate the eraser
in the editor and load the tool options bar with the tool settings.
By default the eraser tool erases to transparent. The transparency is indicated by the
checkered tiling in
the erased area.
If you wish to erase to the background color, deselect the transparent
background checkbox in the far right of the menu bar color selection panel.
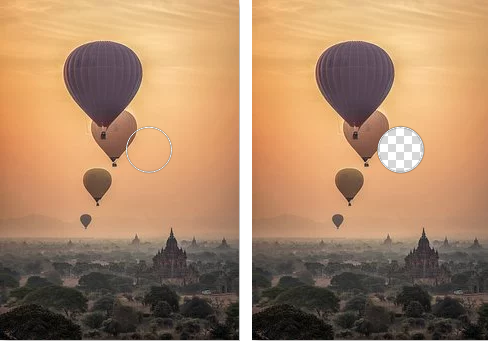
Moving the mouse over the image shows the the eraser tool cursor. The cursor is a circle
which has a
diameter set by the Size setting in the tool options bar.
Changing the 'Size' setting, as shown below, also changes the diameter of the eraser
cursor circle.

The cursor circle indicates the area
that will be erased when you click or drag in the image with the eraser tool. In the
pair of images below
the first image
shows the mouse over the image in the editor. The second image shows a single click in
the image with the
erase tool
clearing the area covered by the eraser brush.
The Blur radius setting in the tool option is used to soften the eraser strokes.
It is analogous to the hardness setting in Photoshop and GIMP.
The more you increase the blur radius the more the eraser will appear to spread the
eraser stroke or reduce
the hardness.
The blur spreads the transition between the erased and un-erased areas at the border of
a stroke.

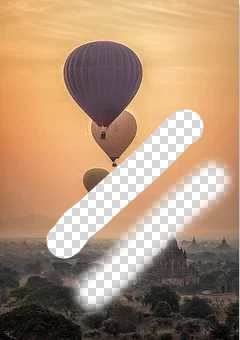
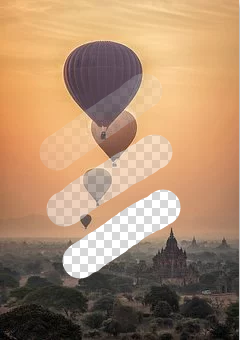
Below shows an image with two eraser strokes. The stroke at the top has 0 blur radius,
hence the sharp, hard
edge. The stroke below it has a blur of 5 pixels.
It has a soft edge because the erased area transitions from transparent to opaque in a
5px border around the
stroke edge.
The erase tool does not have to completely erase at all times to full transparency. You
can set the
Opacity in the tool options
to set the strength of the eraser tool.

A value of 100, the default value, will erase completely, 50 will make the image
semi-transparent and 0
opacity will make
the eraser tool have no effect on the image. The image below illustrates the effects of
changing opacity on
the eraser strokes. The opacity values
are 20 for the top stroke, 50 for the center stroke and a value of 100 for the stroke at
the bottom.
The higher the opacity the greater the strength of the eraser tool.
3. Eraser tool options
-
Size:
Sets the diameter of the brush strokes for the eraser tool. -
Blur:
Sets what would be called the 'hardness' in other editors such as photoshop or gimp. The blur makes the edge of the eraser brush stroke less sharp or fuzzy. -
Opacity:
The opacity sets how much the eraser tool erases in the image. A value of 100% means the eraser is at full strength and erases completely while an opacity of 0% means the eraser stroke is invisible and will not erase in the image.
